
Namespaces in VB.NET
I may have already mentioned that the .NET Framework is huge. In an attempt to keep things organised, and to help you keep your own code organised, Microsoft introduced the concept of Namespaces in VB.NET.
Can you remember using the Import statement in the previous tutorials?
Imports System.Collections.Specialized
Or
Imports Collection_Class.BookCollectionFactory
With these statements, you were actually instructing Visual Basic that you wanted to make use of a class within the System.Collections.Specialized and the Collection_Class.BookCollectionFactory Namespaces.
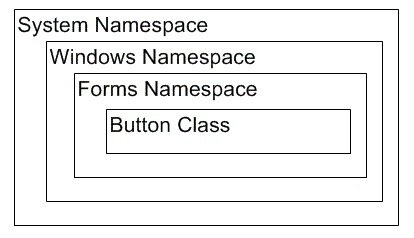
Think of a Namespace as a container. Much like a folder on your hard drive. These containers contain classes for you to work with and other Namespaces/containers. In the .NET Framework there is a top level Namespace called System. In System you’ll find you’ll find a number of other Namespaces e.g. Windows. Look in Windows and you’ll see classes to use and more Namespaces. To get to the Button Class you need to reference the System.Windows.Forms Namespace.
The diagram below attempts to describe the Namespace structure required to expose the Button Class.
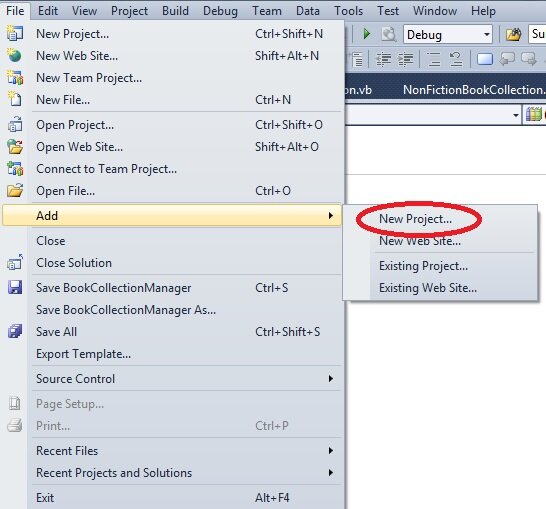
To illustrate the value of Namespaces, Open up the Collection Class Project and click File >> New Project as shown below
From the Add New Project dialog click Class Library with the name BookCollectionManager as shown below.

You should have two Projects in your Solution Explorer now, Collection Class and BookCollectionManager. In BookCollectionManager you should have a Class called Class1. Delete that class (select the class in the Solution Explorer and either press the Delete key or right click on your mouse and click Delete. When asked if you want to delete this permanently click ‘OK’.)
We are going to create a Class Library of our BookCollection classes. The quickest way to do this is to drag the files BookCollectionBase.vb, BookCollectionFactory.vb, IBookCollection.vb, NonFictionBookCollection.vb and VBBookCollection.vb from your Collection Class project into this new BookCollectionManager project.
You’ll notice that Visual Studio creates a copy of these classes and they remain in our Collection Class project. Delete these files from the Collection Class Project, so you have only one class, the Form.
By default the namespace for these classes would be BookCollectionManager as that is the name of the Project they are in. However we will organise them further. To specify a Namespace for our classes, we use the syntax:
Namespace namespacename
     Public Class classname
     End Class
End Namespace
For example, in the BookCollectionBase class we wish to create a Namespace called BookCollectionManager.BaseClasses.
To do this add the following code at the top of the BookCollectionBase.
Namespace BaseClasses
     Public MustInherit Class BookCollectionBase
          code
     End Class
End Namespace
Add this Namespace definition code to the BookCollectionBase class. MAke sure you add the End Namespace at the end of the class.
This class will now be in the Namespace BookCollectionManager.BaseClasses. BookCollectionManager because BookCollectionManager is the name of the Project and BaseClasses because of this new Namespace definition.
I want to keep the BookCollectionFactory in the BookCollectionManager Namespace so we don’t have to add any code.
Add the following Namespace to the IBookCollection interface class, remembering to add the End Namespace at the last line of code.
Namespace Interfaces
     Public Interface IBookCollection
We now need to reference these namespaces to make use of them.
The BookCollectionBase class needs the following Imports statements at the top of the class, before the Namespace definition, as it uses the OrderDictionary class and our IBookCollection interface.
Imports System.Collections.Specialized
Imports BookCollectionManager.Interfaces
The BookCollectionFactory needs these Imports statements as it uses the VBBookCollection and the NonFictionBookCollection classes in addition to the IBookCollection interface.
Imports BookCollectionManager.BookCollections
Imports BookCollectionManager.Interfaces
Finally the VBBookCollection and NonFictionBook Collection classes need to use the BookCollectionBase class so add the following in both classes.
Imports BookCollectionManager.BaseClasses
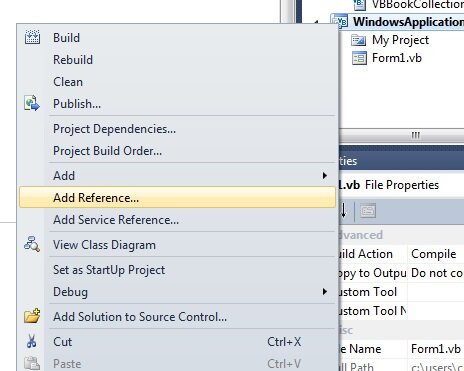
To make use of these classes in our Collection Class project, click on the Project in the Solution Explorer
Right Click this Project and click Add Reference
This adds a reference from one .NET Project to another, meaning the code in the referenced project can be called if there are publically accessible classes in there.
You should now see a dialog like the following:

Click the Project tab, select BookCollectionManager and click OK.
Finally in the Form change the Imports statement from
Collection_Class.BookCollectionFactory
To
Imports BookCollectionManager
Imports BookCollectionManager.BookCollectionFactory
Imports BookCollectionManager.Interfaces
The first Imports statement gives us access to the BookCollectionFactory class.
The second Imports statement gives us access to the BookCollectionFactory.CollectionType Enum
The third Imports statement gives us access to the IBookCollection Interface.
If you run your project, you will see the application running exactly as before.
So what exactly is going on here, and why did we bother?
We have two projects. One contains our presentation layer, a Windows Form. This is a project type in .NET which provides a user interface (a Windows Form) and a bunch of controls for an end user to interact with. The second project type is a Class Library. This is an application with no user interface to speak of, but allows Windows Forms and other Visual Basic.NET Projects access to our classes.
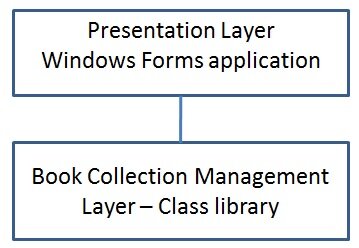
If you click the Build Menu and click Build Solution, in a Windows environment, Visual Studio will build an EXE file (or an executable file) for the Windows Form and a DLL (dynamic link library) for the Book Collection Management layer. An EXE is a Windows application, like e.g. Microsoft Word. The DLL is a set of Windows libraries with no user interface that can be reused by multiple applications. You’ll often hear these referred to as Assemblies in the world of .NET (quite why they use a different name is beyond me). To distribute this application you can simply place these files on any machine that have the .NET Framework installed. Two files, that’s all you need to distribute.
The beauty of creating an application with this structure is that can multiple Windows Forms applications can access our business logic. We can reuse all of the BookCollection logic in many applications! For larger teams, this also means that we can have a developer or team of developers developing one layer and another team developing the other. In the world of .NET, we can have a C# Windows application accessing a VB.NET Class Library! This was, and remains, a massive shift in how programmers work together.
In our next tutorial we will put this reuse to the test by accessing our BookCollection classes in a Visual Basic Web Application.